Okay, first I have to start with the car. Oh, poor Roxy. She was more of a mess than I thought. I'd hoped the noise she was making was because the bushings were going bad. But upon examination by a qualified mechanic, whom I trust, it turns out there was much more wrong with her than that. So she got new ball joints and control arms and new wheel bearings and new transmission lines. And I am out a small fortune that I'll be paying off for six months or more. Which is less than fun but I will deal.
Second I have to say that I ended up getting sent home from work today. It's actually pretty cool when you have a headache bad enough that your boss notices and tells you to get out and go home and get better. Now, granted, she needs me to come in tomorrow so she'd rather I went rested so that I didn't have to cal in tomorrow, but still. There's a lot of things that are crappy about my job, but the people, and the family atmosphere in our little office, isn't one of them.
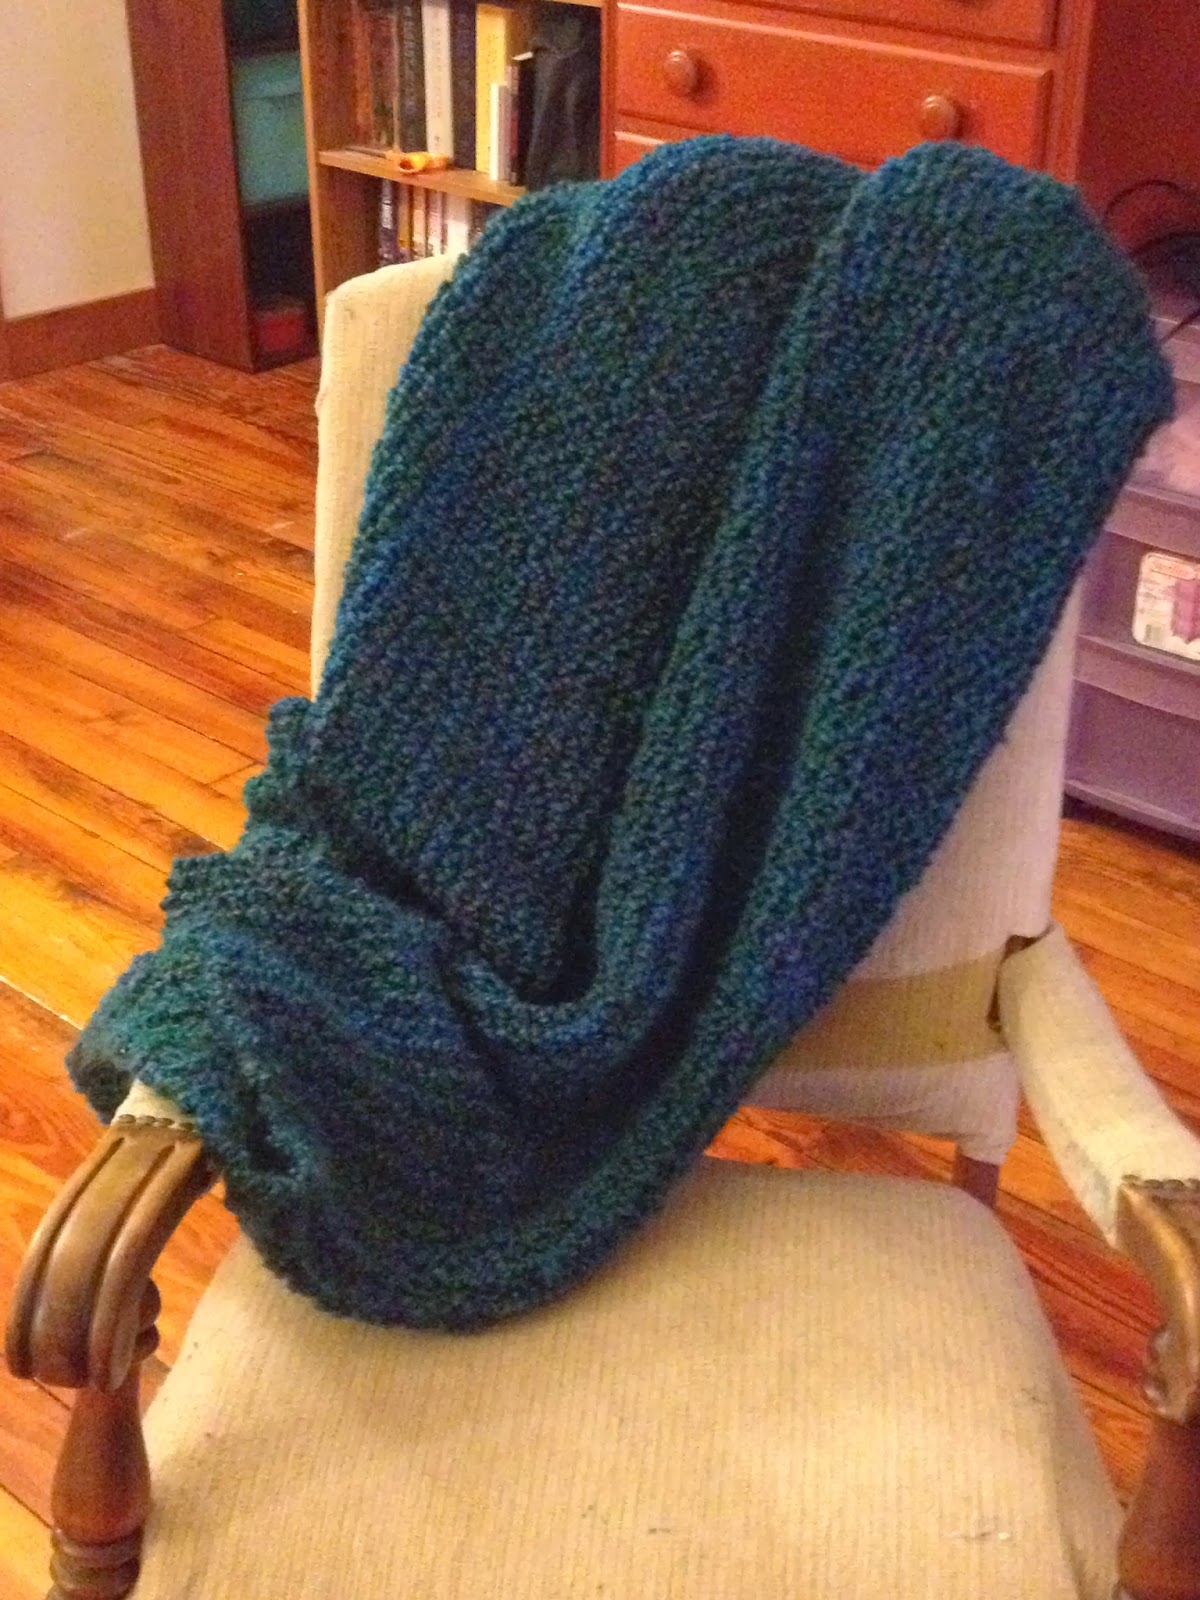
But after pain relievers and a good long nap, I woke up feeling 95% better and that was awesome. I was able to eat, and that helped even more. And then, I sat down and finished the scarf I'd been working on. I'm keeping it and I love it a lot.
So, I adore it. And it's actually brighter than what is usual for me. I honestly didn't expect to like it as much as I do. But because I do, I have no qualms about keeping it, even though I usually feel guilty about making stuff for myself.
It was super easy too. I only had to frog it twice before I figured out that a simple basket weave pattern would both show off the yarn and give it texture and excitement. It's color change yarn, and it happened to work out that the number of stitches I used meant it self-stripped. Which, I think, is awesome.
Pattern time! In case anyone cares to give this a go.
I used Hikoo by skacel Simplicity for the yarn. It's a DK weight, but I used size US 8 needles (5 mm). It gives the yarn a bit more stretch.
CO 50 (or any multiple of five)
Row 1: K 5, P 5 to end
Row 2: P 5, K 5 to end
Row 3: rep row 1
Row 4: rep row 2
Row 5: rep row 1
Row 6: P 5, K 5 to end
Row 7: K 5, P 5 to end
Row 8: rep row 6
Row 9: rep row 7
Row 10: rep row 6
And yep, that's it. Repeat these 10 rows till desired length, bind off, and you'll have alternating blocks of stockinette and reverse stockinette that are 5 stitches wide and 5 rows tall. It means that this scarf is basically reversible, because whichever side is showing is the right side. I love that in scarves.
Okay, yeah, super easy pattern right? Sometimes, simple is better. Not always, but in this case, I definitely let the yarn do the work and I didn't want to muck it up with complicated stitches. Besides, reversible! :D
Welcome
Welcome and thank you for visiting! Here you will find a bit about my life, including my obsession with the fiber arts and the written word.
Showing posts with label pics. Show all posts
Thursday, January 29, 2015
Sunday, November 2, 2014
Left One First
So it's November! Yay! That means October is done, and I have a weird and completely inexpiable dislike for that month. But November is here and that is good.
Less than 8 weeks till Christmas! Woo!
So yesterday, I had a marathon yarning session. I made up my own pattern for a pair of fingerless mitts. And you know how I hate doing two of something. So it was torture. The good kind, but torture nonetheless. But I was bound and determined that I would get them done, and it took me all damn day but they are finished.
It wouldn't be me if everything worked out properly of course. I had to frog it twice before I really got started. I made them with variegated yarn, and normally when I do mitts, I work the ribbing flat, and then start working in the round, sewing up the gap in the beginning. But because of the way these colors worked, I had to start in the round from the very beginning. So that was the first frog.
The second happened after I had finished about two inches, and realized they weren't big enough. Because, you know, math. So I had to take rip it out again. These both happened on Friday night. So I made a plan, and got cracking early yesterday morning.
And dudes, it worked out perfectly! I was a little bit surprised myself. Because, you know, winging it as I went along. I mean, I knew theory and all but putting it into practice was something else entirely. I had very specific requirements, and I had to custom fit them to someone. So I was convinced it was going to be one big hot mess. Especially after the false starts. But yeah, once I got going, and it was actually working, I was like a yarner on fire.
My fingers are sore, and my wrist is aching something fierce, but yeah, I got two mitts done. After I finished the first one, about 3 o'clock, I had a serious attack of SSS. Holy crap, did I not want to do the second one. It was epic, and I whined out loud even though there was no one to hear. But I just made myself do it. The second mitt took a bit longer, because I had to take breaks and procrastinate a little with Youtube. And then there was a whole incident with being roped into taking Tato to work. And then, long about ten, I was so tired I was nearly falling asleep. But I was so close to being done, that I just made myself push through. It took me until about 11:40, but God that sense of satisfaction was huge.
But here's the thing that I realized when I was working on the mitts. I made the left one first. And it occurred to me that I always do. When making mitts, and I've made my fair share, in which there is an actual wrong side and a right side, I always make the left one first. I have no clue why. But it's an interesting observation anyway.
The yarn is totally sumptuous, 100% alpaca, and it just feels awesome. And as per usual, I overbought. This time, though, I really thought it would take almost the entire hank to make one, so I bought two hanks. It took about 2/3 of one hank to make both. Of course. The good news is that I have the lovely, wonderful yarn now that I can use for something else. Maybe fore me, as it's blues, and I love blues.
I'm not going to post the pattern, because I only have it half written down in "Kris speak" but if anyone wants it, just drop me a note and I'll send it to you when I have it transcribed into English. Well, into knitting, but you know what I mean. In the meantime, check 'em out!
Monday, October 13, 2014
Sister Time!
So, Sis and I had extra sister time this past weekend. Started with dinner out on Friday night, just because. Then Saturday we hit the craft store and then had lunch out. It was really good food. Both times.
While at the craft store, Sis bought a ginormous crochet hook. The biggest they make. And really fat yarn. And then, she crocheted a wrap while I crocheted on a blanket and we watched West Wing.
Comparison of one strand of the fat yarn, next to a single strand of regular, standard medium weight yarn. Huge right? Ginormous. But that's okay, because it works up really quick.
See how big this freaking hook is? Do you remember my really big knitting needles? It's about the same size, roughly an inch in diameter. And you can see how it all works up, how big the stitches are. How quickly you can make a 36" by 25" wrap.
And this? This is the wrap. Which is so warm and cozy it's ridiculous. And also mine. Did I mention that part? No? Well it is! She made it just for me! Technically, she gave it to me as my birthday present, and said she did better than I did (yes, she did. It only took her six and a half months, instead of the 11 months it took me for the first time, and the 10 it took me the second time) And it's mine, and Sis made it for me. For me! Some actually yarned for me!
Tuesday, September 2, 2014
The Fickle Yarner
So yeah. The fickle yarner is back. I was working on that lovely blanket this past weekend and then...well, this yarn popped into my head and the shawl I was going to make myself, and as I was working along on the row, my brain was trying to figure out what I could do with that yarn for a shawl. Well I did a little internet search and found a pattern I liked, and decided to go for it. I made it in about three hours total, though it was spread over two days.
What I love about this yarn (so very much) is that it's really warm but really light. I don't know quite how it manages it, but it does. I was working on it, and it got big enough to spread on my lap and then...I was sort of amazing how I couldn't even really feel the weight of it, but I could feel it's immense warmth. Now, I've made a different shawl from the same kind of yarn before, and I felt it then too, but I'd forgotten. And it was really fabulous to be reminded.
So yeah, guys, this is for me and just in time too...because summer is technically over, at least the season, and it's September, and pretty soon, it'll be a bit chilly, and I'll be happy to have it.
Wednesday, May 28, 2014
Cat and Yarn
I came downstairs to this last night. Apparently, Simon felt it was necessary to guard the salsa. Actually, he's got this thing about being on counters. That counter in particular. It's like that his spot. We tried to break him of the habit when we first got him. We tried the evil squirt gun trick, but this cat actually likes water so that didn't work. We tried positive reinforcement when he got down. We tried just picking him up and moving him. But nothing worked. Now, we just wipe down the counter when he gets down. Why yes, we do spoil our cats, thank you for asking.
And this was how I spent the majority of my weekend. Some of the colors, unfortunately, are a little washed out, and I had a hell of a time trying to decide how to arrange the squares. But Sis came to the rescue, and that's what she decided. I had actually made the colored part of the squares a year or two ago. And then it languished in unfinished land. But I finally got inspired to finish it up. It's my first truly knit/crochet combo pattern. Really, it's simple enough. I knitted the mitered squares, then crocheted around them in black, and crocheted them together. It's not completely done yet, as you can tell. You can see how it's still scunchy in some parts, because it needs to be blocked. And I'm not done with the crocheted boarders. It's about 30" X 40" right now, not very big. But I'm going to make it bigger with the boarders until it's a nice lap size. And then I can drape it over my legs while I sit and read. That's the plan anyway.
The good news is, I like it a hell of a lot better than I thought I would!
Friday, May 16, 2014
Baby Blanket
Ta Da! Baby blanket is done!
You didn't think I'd do it, did ya? But it's done and with plenty of time to spare. I worked it with uneven stripes because I thought it gave it a fun and funky twist. Just a little something different to give it a little flair. So that's another project I can cross off the list! Go Me!
And yes, working on it, without thinking too much, getting lost in the repetitive nature of the stitches...it really helped to center me. I'm feeling better than I have in a couple of weeks. And that is a great feeling.
Saturday, March 22, 2014
Skullz
![]() |
All laid out |
![]() |
Closer up |
![]() |
Closer still! |
So, now it has about 24 hours to dry and hopefully, it'll be ready to go when Izzy is ready to leave. In fact, I've decided it will be just fine by the time tonight rolls around. And hey, it's only three months late! That's way better than I do on Sis's birthday presents! :)
Saturday, February 22, 2014
Spock...in yarn
I didn't do some of the things I had intended because well...this. This had to be made. Don't you agree?
Sunday, February 2, 2014
Two At A Time
Here's the thing about making stuff that comes in pairs: it's hard to make them exactly the same. Even if you count rows/rounds meticulously, there's still a margin of error. I usually do pretty well but there's always slight differences. A stitch or two, a row or two...they fit differently. I finished Mom's mitts the other night and the difference is a lot more than normal. I'm a little bit upset about it, to be honest.
The wine colored fingerless mitts I made are pretty good. My mitts have a row difference that I only notice sometimes. I remember when I made the BFF's mittens the first time around, one was a couple of rows longer than the other.
There's a way to almost eliminate this. When you are making something that there are two of--mitts, socks, sleeves--you can knit them both at the same time. This way, you are essentially working the same row on each thing at the same time. I've only tried it once before, when I was playing with sock yarn, and ended up accidentally using the wrong ball of yarn, so that I connected the socks. Frustrated, I tossed it aside and have only worked one at a time since.
But seeing the difference in Mom's mitts...and remembering the difference in the first pair of BFF mitts...I decided to give it a go again. I tried. God knows, I tried. But I couldn't seem to get my needles sorted and everything kind of got completely frustrating and It just all fell apart. And then, I thought I had gotten it all set, only to realize I had screwed up the pattern on the second row and hand to pull one out and that I would be much slower when I had to switch back and forth between the different balls of yarn. And I was worried that I would get into a rhythm and just...forget to pick up the right yarn. At that point, I decided it was much easier--and sanity saving--to just make one at a time.
Though I admittedly sometimes feel like a failure when I can't manage to master a simple technique like making two mitts at one time, I also know that I'm a pretty good knitter and I make beautiful things. So I've got my trusty click-action row counter, and I'll pay attention, and hopefully, things will work out like they are supposed to. Wish me luck!
Thursday, January 23, 2014
Mitts!!
Okay, so, technically, I only have one of each done. But I thought I'd share the patterns with you!
First, Mum's mitt.
I used worsted weight for these. You need both size 5 and size 8 needles. Because I like to do the ribbing part in a smaller size needles so that it's nice and fitted. This mitt is worked in the round in whatever your preferred method is. Gauge isn't super important considering they are mitts. And it's completely customizable in both length and width.
Pattern notes: Moss stitch in the round is as follows: rounds 1 and 2--knit 1, purl 1. Rounds 3 and 4--purl 1, knit 1.
Cast on 40 stitches. With smaller needles, work in 1x1 rib for at least two inches.
Switch to size 8 needles and work moss stitch for ten rows. Here's where we put in the steek. At the end of round 10, cast on five stitches (either purl cast on or "e" cast on works well) and join to beginning of round. For the next inch or so, continue working moss stitch on the body of the mitt and knit the steek stitches (which is roughly 8 rounds) and then bind off the steek stitches when you come to them. Work moss stitch for another 6 or 8 rounds, depending on the length of palm. Then switch back to size 5 needles, work about an inch of 1x1 ribbing and bind off.
Now comes the scary part. You have to cut open the steek. Remember that knitting unravels up and down, not side to side. There are plenty of excellent tutorials on the web about sewing up and cutting steeks and, to be honest, they would all do a better job teaching you than I. Sew up to reinforce the steek, then cut right in the middle of the center stitch. At this point, you can just tack down the lose ends or, like me, crochet a quick single crochet edging around it to give it a bit more finished look and a bit more stability. (If anyone wants a more in depth tutorial, I can try to help or find you some good vids. Drop me a line and I'll be happy to help!)
Now, my mitts? Way easier! Because I used a DK weight for mine, I used a size 5 needle for the whole thing. Like I said, variegated yarn does the work here. I casted on 40 stitches and worked 1x1 rib flat until I had the desired length and bound off in pattern. Then I sewed up the seam, not stitching where I wanted my thumb hole to be. It's basically a really skinny tube with a whole lot of stretch. Just pull it on and it keep everything nice and warm! Ta Da!
So, really, that's it. These kind of fingerless mitts don't require a lot of concentration or particularly advanced skill. If you can knit and purl, you can do this. The steek is a bit scary, I'll freely admit. But it works well. And you can always knit those flat and sew up the seam if it's not something you want to try.
Anyway, I'm happy. And if I can keep SSS from kicking in, I'll be good to go!
Wednesday, November 27, 2013
Fin!
Some Christmas decorations may or may not have already found their way out of storage and onto the walls/tables/doorways. I take the 5th on the grounds that what I say might incriminate me.
But! Good news! Fantastic news! Yes, it's true. I finished Sis's blanket! You're shocked and surprised, I know. But it really is done and I have the photographic evidence to prove it!
Ta Da! Here it is, ladies and gents! The finished product. Can I just tell you how relieved I am? Cause, seriously. It took forever and a lot of that was me being lazy and just not wanting to. But I realized yesterday afternoon I was in the home stretch, that it was almost done and if I just put in a few hours more work, I could finish it off. It did take a bit longer than I anticipated, of course. Because I kept getting distracted by the TV and I was knitting kind of slowly. But then I got down to it and just got it done.
Finished size: 60" by 120" Big right? Honestly, I could have kept going a bit and made it wider but...well, it was big enough and it was unwieldy and I was ready for it to be done. Yes, I have a couple of skeins left over. But that just means they can be used for another project in the future. A big, thick, cushy scarf or shawl, I'm thinking. I wish you guys could feel this yarn. It's so soft and cozy.
She had no idea it's finished yet. I'm going to leave it for her to find. Because that amuses the crap out of me. Not going to say a word, just kind of drop it off. I'll be giggling about that all day. And just in time too, as the snow has finally started and is apparently sticking around. Now, she can stop nagging!
This is it, all laid out on the floor. You really can't grasp just how long it is. Because I knitted it garter stitch, it scrunches up a little in the middle when it's just left to it's own devices. But it's got a lot of stretch so it's made for tucking around your body.
But it's done. And I am pleased. I just hope she likes it. I mean, I know she'll like it. I just hope she doesn't have any complaints about it as well. Love my sister to bits and pieces, but sometimes she's a complainer. I just don't want to hear about how she wishes it were bigger. Of course, I think she knows better than to say that to me. Plus, she's a yarner herself so she knows how much work goes into it. I really think she'll appreciate the heck out of it.
And hey! I finished it a month earlier than last years! This time, it's only 10 months late! :)
Monday, October 28, 2013
Fingerless Gauntlets
All done! Gauntlet style fingerless mitts! I knitted them flat and then sewed them up, leaving a space for the thumb to go. It was the easiest way to get what I wanted.
Pattern is simple enough: Cast on 39 stitches. Knit 1x1 rib for about four inches. I like the 1x1 (knit 1, purl 1) because it fits tightly and doesn't move. You can't really do a 2x2 here because it's an odd number of stitches
After you have the ribbing (you can make it as long as you want) you start the pattern. Knit a row to set it up.
Row 1--K3, slip 1, k3 to end
Row 2--P3, slip 1, P3 to end
Row 3--repeat row 1
Row 4--Knit
Row 5--K1, slip 1, K3, slip 1, rep to last two stitches, slip 1, K last stitch
Row 6--P1 slip 1, P3, slip 1 rep to last two stitches, slip 1, P last stitch
Row 7--repeat row 5
Row 8--Knit
Repeat these 8 rows four times, until the pattern section is four inches.
Knit 1 inch of 1x1 ribbing. Bind off
**Whenever slipping stitches, slip purlwise with the yarn with the yarn in back for the knit rows, and the yarn in front for the purl rows**
Then, sew up the seam leaving hole for thumb. And there you have it!
Fingerless Gauntlet style mitts! This pattern is highly customize-able. If you need to make them wider or skinnier, just make sure you increase or decrease your cast on by four stitches. And you can make them as long as you want by either working the ribbing or pattern for longer stretches. Same goes for making them shorter, only do less rows. Then, when you seam it up, you can put the thumb hole wherever it best fits.
A bit stretched out by my fat arm/hand. But you get the idea The BFF has skinnier arms than I do, and these are for her. |
Saturday, October 19, 2013
Journey
Off to Massachusetts! Taking this sweet little hat with me, along with the fish.
See you on Monday! Enjoy your weekend!
Friday, October 18, 2013
Stroller Toy
Ok! Ta Da! Made a stroller toy! Okay, so you can actually hang it on a stroller or a crib or even the car seat. But fun right? You can click to embiggen. Anyway, so this is my fish stroller toy and I didn't like the tails that the pattern originally called for so I made my own instead.
And this one is a slightly different angle so you can see different parts of different fish. So, anyway, a little something to stimulate his little growing mind and to occupy his time. And maybe improve his hand-eye coordination as well. I used the bright colors because that'll definitely catch his interest.
So that's done and that's what I'll give at the baby shower. Now, down to business! We're leaving tomorrow somewhere around noon so I'll be around this weekend, but only as time/cell service allows. (To be fair, I doubt coverage will be an issue, but you never know when you might end up in a dead spot) And considering my weekend, I'm just going to go ahead and say that the next ep of Second Blessing will go up on Tuesday. I may be able to finish it in time for Monday, but to ease stress (because I have enough heaped on this weekend) I'm just going to call it a Tuesday posting so I don't have to worry about it. On Monday, instead, I'll give a recap of my weekend. And if the leaf peeping is any good, maybe there will be some pics of that as well. I haven't been to Massachusetts since I was about 18 (which is sad, because it's right over there) and it was a spring time trip. Tune in Monday if you want to know about my weekend!
Everyone, have a lovely weekend yourselves. And I hope yours is less stressful than mine expects to be. And hey, maybe it'll all go better than I anticipate! One can hope, yes?
A closer up shot. It's hanging on the curtain rod in this pic and in the next one. Because, you know, the curtain rod acts like the cross bar on a stroller/crib/car seat and so I wanted to see how it would look. Still cute? I think it is.
So that's done and that's what I'll give at the baby shower. Now, down to business! We're leaving tomorrow somewhere around noon so I'll be around this weekend, but only as time/cell service allows. (To be fair, I doubt coverage will be an issue, but you never know when you might end up in a dead spot) And considering my weekend, I'm just going to go ahead and say that the next ep of Second Blessing will go up on Tuesday. I may be able to finish it in time for Monday, but to ease stress (because I have enough heaped on this weekend) I'm just going to call it a Tuesday posting so I don't have to worry about it. On Monday, instead, I'll give a recap of my weekend. And if the leaf peeping is any good, maybe there will be some pics of that as well. I haven't been to Massachusetts since I was about 18 (which is sad, because it's right over there) and it was a spring time trip. Tune in Monday if you want to know about my weekend!
Everyone, have a lovely weekend yourselves. And I hope yours is less stressful than mine expects to be. And hey, maybe it'll all go better than I anticipate! One can hope, yes?
Wednesday, August 21, 2013
Shawlette
All right. Here it is. It actually turned out smaller than I thought it was going to be so it's really more of a shawlette. But it's enough to go 'round her shoulders and it is warm. And check out that shawl pin! Sweet right? It's actually reversible...there's a different design on each side of the circle. So that's a fun thing, she can pick which side, the flowers or the leaves, she likes better.
So, yeah, I definitely know now that I don't want to make Auntie's shawl this way. I will find a different technique.
It was a fun experiment and I'm glad that I tried it, but the big problem was, because it was worked top down, I couldn't really see the whole shape of it and measure it for size because the long sides were always scrunched up on the needles. It made things difficult. So I know that next time, I will not be working it that way. And I'm thinking that I'm going to make hers a different shape. I can understand why others like to make shawls with this sort of pattern. But it's not for me.
Aw shucks, I guess I'm going to have to spend a bunch of time looking at patterns. :)
Tuesday, August 6, 2013
Sorting out the Troubles
Okay, first off? The trouble with blogger this weekend was, of course, with me and not with blogger at all. Turns out my browser was being ridiculous, but it seems we have that sorted now.
I totally had a monster fail. I really don't have the right kind of yarn for it. Try as I might, I couldn't make it work like it was supposed to. That's my bad and the fault lies solely with me. I may try him again some day when I get a different sort of yarn.
But happy accident!
Look! It's a tribble! Thank all the gods and goddesses in the heavens, I only have one right?! Or then I'd really have trouble!
Okay, yes, I did give the tribble eyes that you can actually see, but he was too cute not to have a bit of a face. He'll be going to his new home with Tato tomorrow. My brother will be well pleased with his birthday present. And seriously, y'all, if there was a way to make this blog touch interactive, I would do it because this yarn? It's like the softest, best feeling yarn in the world. I'm gonna have to get me some more and make me a neck warmer or something for the winter. Because it's awesome times a billionty. Anyway, he's getting that and a movie of his choice. Pretty good gift, right?
Now it's back to Sis's blanket again. My newest goal where that is concerned is to get it done before I have to start working on the BFF's birthday present. I've got a couple months. I should be okay.
Right?
Friday, August 2, 2013
What I'm Working On
Seriously, this pic does not do it justice. We can see the pretty color, so that's nice. But the size? Totally masked. Since I'm working it on circular needles, you're only seeing half the length. Remember, I'm working it side to side, not top to bottom. And its loose garter stitch, so there's some stretch and...anyway, it's almost, but not quite, half done. When I do finish it, I'll stretch it out to it's massive length and show it off that way. I don't know if it really comes off in the picture just how thick it is. You can, of course, click it to embiggen. What do you think? Looks warm and cozy right? And I put the skein in there so you can see how the yarn is nubbly. I think they technically call this a boucle, but I personally not regard it as such. I'm picky that way. But it's very big and very warm, and I hate working on it during these hot days because it makes my lap uncomfortable. The only thing that keeps me going at all is I know how much Sis is going to love it when it's done.
Now, this? This is my fun side project. I started this, to play with the top down shawl pattern and this is how far I've gotten. It starts with five stitches. And you grow it with yarn overs, you can see them there where there are holes, and you just keep adding yarn overs so every other row gets four extra stitches. And that's how you get the triangle shape. You see there in the middle where all the holes meet? That's the starting point. and I'm working down the long sides, back and forth. It's garter, too, because I didn't want to have to block it when I was done. The one thing I've learned from this is that I don't want it to be garter based when I make Auntie's shawl. Even though that makes it totally reversible. If I do it stockinette, though, I'll have to block. And I don't know how well that's going to work out. I'm still exploring my options. I came across a pattern booklet that claims you can take any pattern stitch, plug it into her equation, and you can get a shawl. Any pattern stitch. I'm still debating on whether or not I want to spend the money on it. Because the one thing I know for certain is that I do not want to do Auntie's in garter. Do. Not. Thus far though, I have yet to find a free pattern that I really want to do. If anyone out there has any suggestions, please shoot 'em my way. Cause pretty soon, I'm going to be desperate.
Once again though, I really need to get cracking on Sis's blanket. Because soon, The BFF has a birthday, and she's getting something awesome, though if push comes to shove, I can knock that out in a week or two. I just really don't want to leave it to the last minute. That would suck. And make me a bad friend.
Anyway, that's all I'm working on at the moment. But I have so much more planned. Because people have birthdays. And don't even get me started on Christmas! Good gracious, now I'm starting to panic! It's August already! Why have I been such a slacker?!
Thursday, July 4, 2013
Red, White, and Blue
You know what happens every time I see those colors? I think of this afghan I made for Brub a couple of years ago for his birthday.
I picked it out of book and I got all excited about the prospect of making it and then I got to thinking that maybe he wouldn't love it like I thought he would so I took the book to him and said, "If you were to get one of these, which one would you want?" And to my utter delight he picked the exact same afghan! So, I made it for him.
It was sort of a bitch to make, a variation on a ripple afghan, and it was done entirely in single crochet so it took forever but the end result was so worth it. I really love it a lot.
Happy 4th, everyone. Remember to take a moment today and appreciate the freedoms we have...and the ones we're still working towards.
Thursday, May 30, 2013
The Blocking Debacle
I promised to share the blocking escapade once I knew the items had been received so, here's the tale:
First, I had to go get some fiber wash. Except for some reason, the craft stores I went to didn't have it. I would have thought that they would. But basically, it's designed to wash yarny type things so that they don't get damaged. In the end, I ended up just buying regular delicate wash detergent. And carefully washing it in the bathroom sink. A little bit of suds, some gentle swish, swish, swish and there we go. Then I rinsed it and rolled it in a towel and then stood on it to get the excess water squeezed out. Yes, I stood on it. For anyone who's interested, this is a very effective way of getting rid of excess water.
This is what it looked like, unblocked. I used the carpet to kind of hold it flat but really it was very much curled in on itself. And the one end was all wonky. And you can't really see the lace pattern. So hence, that's why the blocking was required. The process began as I stated above. And then I had to pin it out. So I got some cardboard boxes that I had already broken down flat and laid them on the bed with a towel over it. And then I set about stretching the piece out to the shape it was supposed to be and pinning it down with...well, there are probably about fifty or so pins. See?
You can, of course, click on the pictures to make them bigger. But yeah, there are a lot of pins in it. And I did it on the bed because I didn't want to have to sit on the floor and not reach what I needed to reach, but I had done it at about seven o'clock at night so I had to get it off the bed and onto the floor. Now, the flat cardboard boxes were not connected in any way, so there was much careful maneuvering in order to get it off the bed and onto the floor. But I managed it, in the end, and there it stayed. I left it there, pinned down, longer than I probably needed too, but after all that work, I wasn't taking any chances.
Anyway, now it hangs all nice nice flat and you can see the lacy pattern well. And that was the goal all along. And truthfully? I don't hate blocking so much anymore. Except not having the room for scarves. So those, I might just have to keep making in patterns that don't need it.
Oh yeah! And I made a pair of gauntlet style fingerless mitts and a plot bunny!
He's so hungry! |
One of my favorite cables |
Sunday, May 5, 2013
Yarn Happened
Yesterday, I didn't even turn on the computer. Not that I, shudder to think, was without the internet. I do have an iPhone after all. But after a little surfing in the morning with my coffee and returning some emails, I ended up devoting the day to yarn. I made this:
And then I made this:
And then I took and nap and when I woke up, I made this:
Oh, and I also made a little baby bootie...just gone one done. Because I finished it and hated it with the fiery passion of a thousand suns so it got thrown out. So, I have to see if I can find a better pattern. We'll see.
Today? First there will be coffee, then words, maybe some reading. Until later this evening when I'll leave the house to go see Ironman 3. So. Excited.
Subscribe to:
Posts (Atom)